Simple Camera Trigger - v3
Introduction
In the previous version, we’ve tried to use the remote controlled bought in amazon to control the camera, using an Arduino.
But something doesn’t work about this remote control and I wasn’t able easily to interact with this PCB from the Arduino.
So, the project will be simpler (HW technically talking) with only an IR Led for controlling the camera and the Arduino’s library IR Remote
Also, there will be some buttons to configure the timelapse and a display to show this information.
Final result
.
IR Sensor
Library and IR Hello World
The first step will be download the IR Remote library. The library will be installed as a normal library.
You can follow the sparkfun tutorial about the IR Communication.
The IR sensor will be connected as a normal LED, but the signal will be connected to the pin 3 in the Arduino Uno. The receiver in this case is not neccesary.

The code for that could be the IRSendDemo included in the library;
#include <IRremote.h>
IRsend irsend;
void setup()
{
}
void loop()
{
	for (int i = 0; i < 3; i++)
    {
		irsend.sendSony(0xa90, 12);
		delay(40);
	}
	delay(5000); //5 second delay between each signal burst
}
You can see if there is a send in the IR with a camera phone (The IR Led normally is visible from some camera mobile phones)
Camera Signal
The second step will be normally to detect what kind of signal we receive from the normal remote control and to try to reply the same signal. But I found even something better: The specific codes to control my camera Sony A6000
Photo     740239    B4B8F   // Shutter | take photo
VID       76687     12B8F   // Start | stop video recording
DISP      166799    28B8F   // Display change cycles round
Menu      117647    1CB8F   // Enter menu | leave menu
MenuU     379791    5CB8F   // Menu up
menuD     904079    DCB8F   // Menu down
menuR     1035151   FCB8F   // Menu right
menuL     510863    7CB8F   // Menu left
OK        641937    9CB91   // Menu OK
Z+        338831    52B8F   // Zoom in
Z-        863119    D2B8F   // Zoom out
With that, you can really test if the IR sensor is working with the camera. And it’s actually taking pictures! Just with an Arduino and a IR Led.
Button
The buttons will be useful to configure the time of the timelapse.

We can see and example about how to use a button from Arduino webpage
Button detection
Normally, we can detect the button easily but, we want to avoid double detection of a button and so on. So, we can do some software to detect the button as state change detection
We could continue developing software, and detect not only the change of the status, also if this change will pass quickly, avoid to be detected as a push of the button.
Everything is set already with this Arduino library
Download here
In this library, it talks about if you connect a button with a pull-up resistor or pull-down resistor (Or if your button is connected as pull-up switch or pull-down switch).
Normally, the up means if it is connected directly to VCC and the down to the GND. You can see this concept in this tutorial
Display
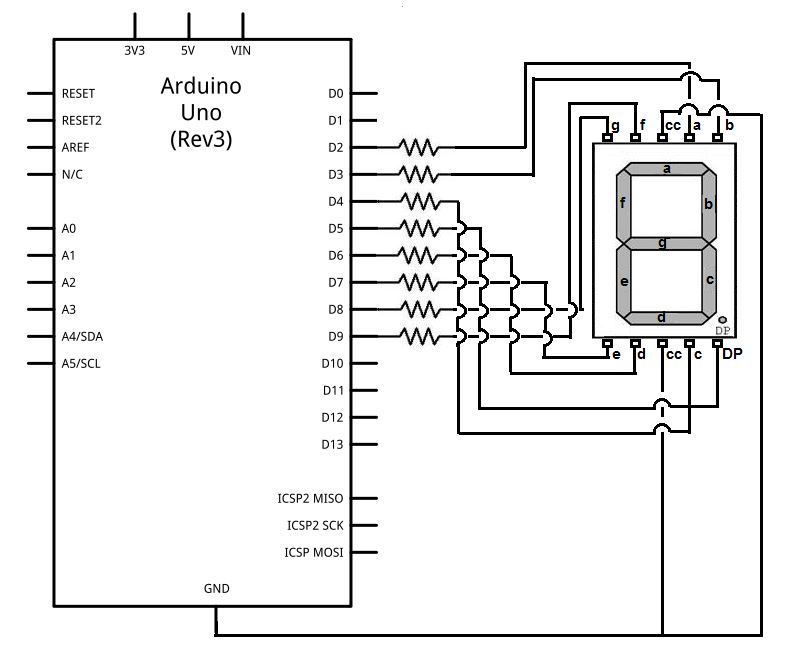
The configuration will be shown with a 7-segment display.
This display is basically 7 leds (8 leds with the decimal point) with the GND in common (common cathode) ot the VCC in common (common anode).
All the tutorial are done for the typical one, which s the common cathode, but I have the second one.
Schematic from this tutorial,
And a pretty code for using it in this tutorial
Class C++ in Arduino
The software start to be big and big so, we need some king of struct.
Arduino allows to create c++ class (they call that create libraries) and the way to do it, it is the same as an standard C++ class, including the library “Arduino.h”
In this moment, you can take the opportunity also to migrate to an other IDE different from the Arduino IDE. Personally, I don’t like at all, and I am using a plugin for the Atom IDE called PlatformIO
Timer
To decide when the shutter will be done, we need some kind of timer. We can use the internal timer from Arduino with the library millis
External interrupts
In the time the Arduino is block in the loop waiting for trigger the camera, we may want to stop the process and change the configuration and so on. This could be possible if we attach an interrupt to some button.
Or this other tutorial
Code example,
const int buttonPin = 2;     // the number of the pushbutton pin
const int ledPin =  13;      // the number of the LED pin

// variables will change:
volatile int buttonState = 0;         // variable for reading the pushbutton status

void setup() {
  // initialize the LED pin as an output:
  pinMode(ledPin, OUTPUT);
  // initialize the pushbutton pin as an input:
  pinMode(buttonPin, INPUT);
  // Attach an interrupt to the ISR vector
  attachInterrupt(0, pin_ISR, CHANGE);
}

void loop() {
  // Nothing here!
}

void pin_ISR() {
  buttonState = digitalRead(buttonPin);
  digitalWrite(ledPin, buttonState);
}
Threads
If the interruption is not good enough for our purpose, we could use even a thread (or in Arduino case, simulated thread) for not blocking the operation each time (For example, in the loop for waiting the trigger).
I see that not necessary finally, but here you have some tutorials;
Camera - Tips for battery saving
You can skip this chapter if you are not worry about your battery from the camera (Because the battery is big enough or you have the camera connected to the mains).
But here you will find some tips for sony alpha cameras
Software
I did a state machine to change between the configuration of timing and the trigger operation.
Also, as I wanted to configure more than 9 seconds, I’ve use the same display to configure the 3 digits in seconds for the timing (So, up to 999 seconds)
The display and the camera are in different classes.
You can see all of this from my github